TP-Link CPE210 and CPE220 Repeater Mode Setup
TP-Link cpe220 and CPE210 both are 300Mbps outdoor CPE devices for long-distance. The difference is only antenna gain but the feature and configuration are the same. CPE220 device supports Router, WISP, Repeater, client mode as well as WDS mode. In this post, you will get a simple configuration guide for CPE220 range extender mode setup. Increase wifi signal up to 100% in every area where the main wifi router signal cannot reach.
If you have TP-Link CPE210, CPE220, CPE510, and CPE520 any of the models then this post will support setup repeater mode for all the models. CPE220 outdoor CPE device can be used outdoor and indoors in both conditions as per recruitment. The LAN1 port support Poe out feature so you can use it to power on any other cpe220 device without connecting power directly from the power socket. It is a PoE pass-through and useful for outdoor installation where we can power one-two device with 1 cat6 cable.
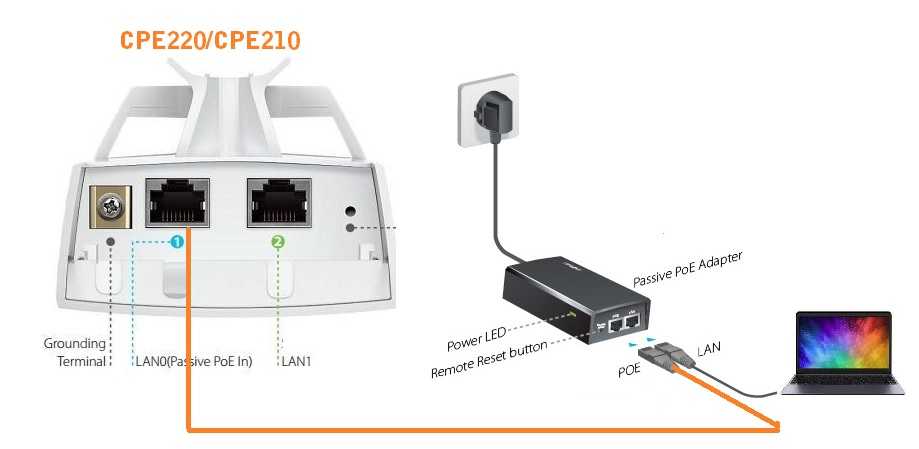
TP-Link CPE220 Connection diagram
CPE210 and CPE220 have two Ethernet ports.
Connect LAN 0 PoE port to adapter PoE port and Adapter LAN port to Laptop LAN port as shown below image.
Configure LAN IP Address.
TP-Link CPE220 Default IP – 192.168.o.254
Username- admin
Password – admin
Use 192.168.0.10 in Laptop/PC Lan IP Address.
Step by step LAN IP Configuration
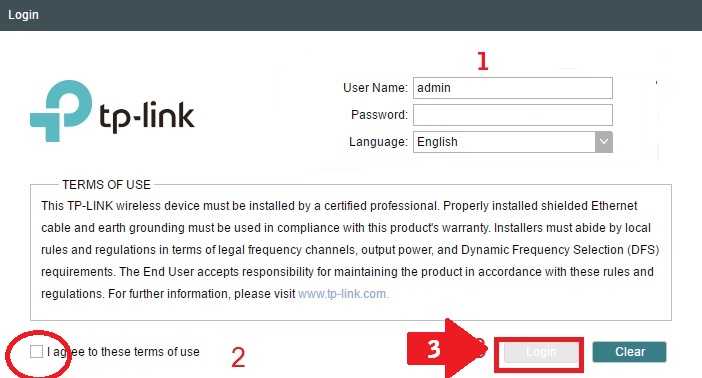
Login TP-Link CPE220 First Time
Open the web browser and type http://192.168.0.254 hit the enter key.
1: username: admin
Password: admin
Language: select your country’s language.
2: I agree to these terms of use- check the box.
3: Press the login button.
In the first login, you have to change the default login password. To keep protected change default login password for cpe220 CPE device.
TP-Link CPE220 Repeater mode Setup step by step
Range extender configuration using wizard is quite easy for beginners and new tech persons.
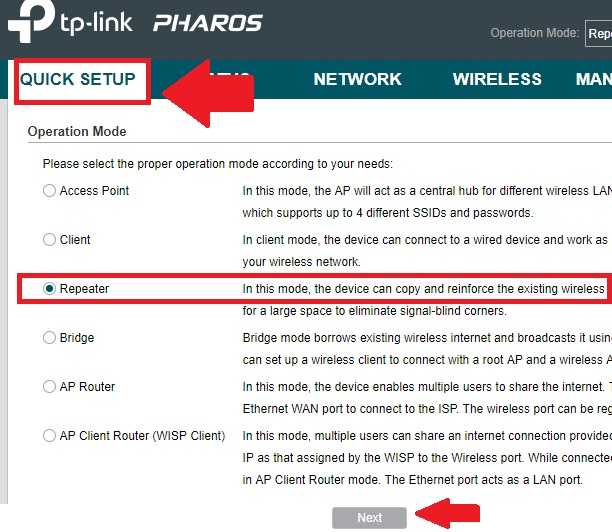
Go to Quick Setup
Operation mode- Repeater mode.
Press Next button
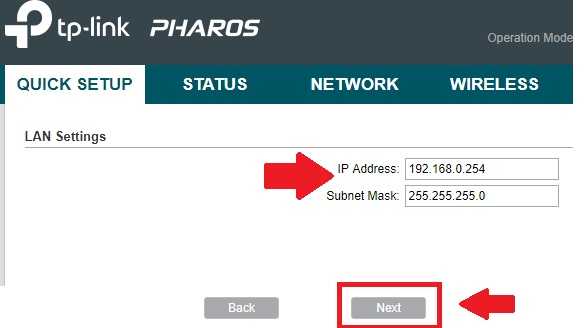
Change the default LAN ip address to avoid network conflict after connected with host AP.
Press the Next button for further steps.
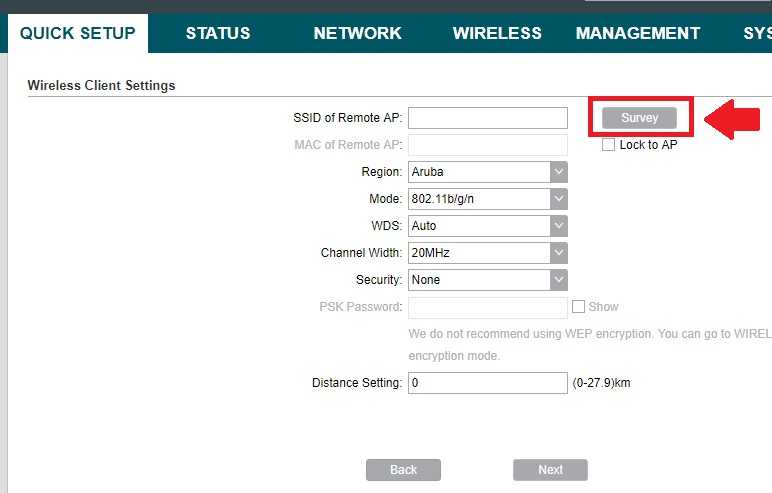
Join Host Access Point network
Press on the Survey button as shown below image.
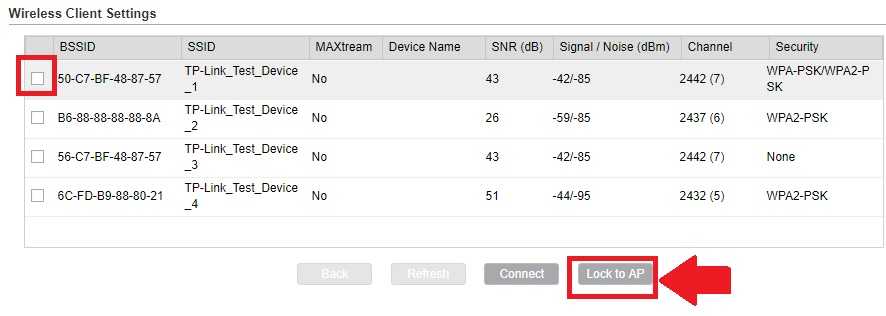
Select your main Wi-Fi name from the list and provide a password.
BSSID– select the checkbox on the first row.
Select the Lock to AP button as shown below image.
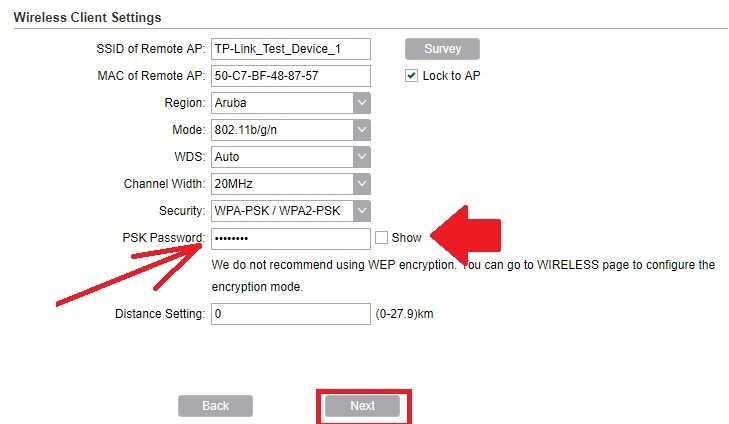
SSID of Remote AP: will show your host AP name.
Mac of Remote AP: host AP Mac ( Lock to AP should be checked to keep connected with the same AP always)
PSK Password: the type of you’re main WiFi router password in the box.
To confirm password check show the option to unhide the password into text.
Press the Next button.
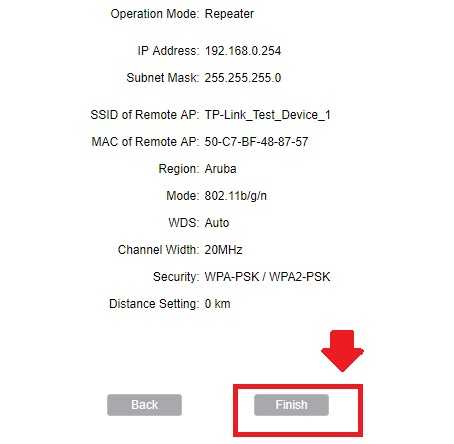
Confirm all the settings before the finish setup wizard of range extender mode.
If all the settings look good Press the finish button.
The device will reboot and will show you an increased wifi signal with the same name.
Apart from the quick setup configuration method if you are a technical person you can use manual configuration. Using manual configuration you can change the repeater settings manual.TP-LINK Pharos outdoor repeater mode setup takes 2-3 minutes only.
Placement of CPE220 Range Extender mode
Place the range extender device into a central location from the host AP signal that can reach at least 45%. Do not cover the range extender device under the box and inside the cupboard.
Related Post
- Create a Local Network using Old Router
- 192.168.11.1 Login Buffalo WiFi to Setup As Range Extender mode
- How to login Aztech Router IP 10.0.10.254
- TP-Link WR743ND Range Extender Mode setup

![Read more about the article TP-Link Archer C20 Range Extender Mode [No Operation Mode]](https://wifirepeater.org/wp-content/uploads/2020/05/TP-link-C20-Repeater-mode-without-range-extender-option-300x174.jpg)

