
Skip to content
  • Home
  • How to
  • Network
  • WiFi
  • List Default Router IP
  • How to Find Router IP
  • Software
  • Contact US
amped wireless extenders

Setup Amped Wireless Range Extender to Boost Range

by admin

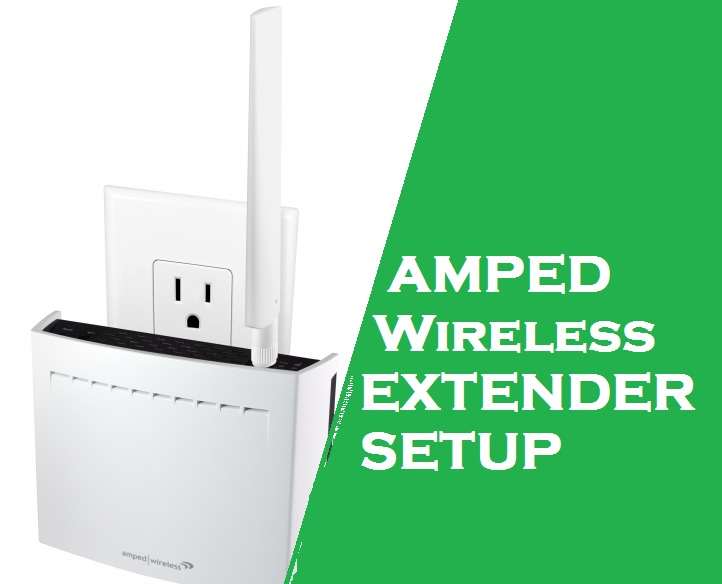
Simple and fast way to Setup Amped Wireless Range Extender using WPS button or from web login to increase WiFI range and internet speed in no coverage area.

Setup Amped Wireless Range Extender

REC15A Amped Wireless High Power Compact 802.11ac Wi-Fi Range Extender with dual-band 2.4G and 5GHz wireless band to extend WiFI range without compromising internet speed. Amped AC1200 range extender, AC2500, and Amped AC750 dual-band wifi repeater setup steps are the same. If you have Amped wireless extender device or planning to buy then this user manual will help you to set up Amped wireless range extender device. you can setup amped wifi extender device using the WPS push button method as well as the login method from a mobile or laptop.  The WPS setup method does not require a physical or wireless connection with the Repeater device but the login method needs to connect the extender device to either a physical LAN cable from an Ethernet port or default WIFI SSID.

Settings up Amped range extender device first time is a bit quick and simple process that required your existing WiFI password If the router does not support the WPS method. Unbox your new amped wireless extenders and follow the steps to setup.

  • List of Best Gaming Modem with Gigabit Speed

WPS Method to setup Amped Repeater

WPS configuration method easy and fast way to setup repeater device to extend the existing wifi range. You can only use the WPS button to connect the Extender device to your host WiFI network if your WiFi router supports the WPS method and is enabled from the setting. Follow the steps to setup Amped REC15A extender and other Apmed wireless repeater devices.

Galaway Wifi Extender Setup

  • Plugged in Amped Extender Unit to Power socket nearby Existing WIFI router.
  • Go to the Main internet router and find a WPS button and press the button.
  • Within 2 minutes of pressing the WPS button on the Main Internet, WiFI router goes to the Extender device and press Amped extender WPS button for 2 seconds, and release.
  • After a few seconds, the Extender device signal LEDs will start to glow after a successful connection with the existing wifi network.
  • After a successful connection with the Repeater device, you will get a new SSID name something like “Amped_REC15A_2.4_EXT and Amped_REC15A_5G_EXT.
  • Now unplug the extender device from the power socket and find a centralized location where the repeater can get Very good signal quality from the host WIFI network and no coverage area can get an extended network signal range.

If your existing wifi router is not WPS compatible and the range extender not connecting through the WPS button then you may proceed to login methods.

  • Wavlink ac1200 Dual Band Range Extender Setup [WN575A3]

Setup Amped Wireless Extender from the Web interface

Configuration from the browser using login extender settings needs a physical or wireless connection with the repeater device. you also need a default login IP address, URL and username, and password for the first-time configuration. Check your repeater device sticker to find Amped default login credentials.

  • How to Find Your Router IP Address

Default Login IP Address– 192.168.1.240

Amped Wireless Login URL– http://setup.ampedwireless.com

Default Login username – create the first time

Login Password- not configured in default mode

Find login information for your Amped extender model number printed on the sticker and user manual included with the box.

  • Default Router IP Address Username and Password All Brands

Steps to Setup Amped Repeater from Settings

  • Plugged extender device power socket in the same room main wifi router installed.
  • Use LAN cable for wired connection or default Amped Repeater SSID “Amped_REC15A_2.4

or Amped_REC15A_5.0” to use a WiFi connection.

  • Open the web browser and access “http://setup.ampedwireless.com” or IP address http://192.1681.240 and wait to load the repeater setup wizard.
  • Welcome to the Dashboard
  • Press the Scan button to search for your existing wifi network SSID name.
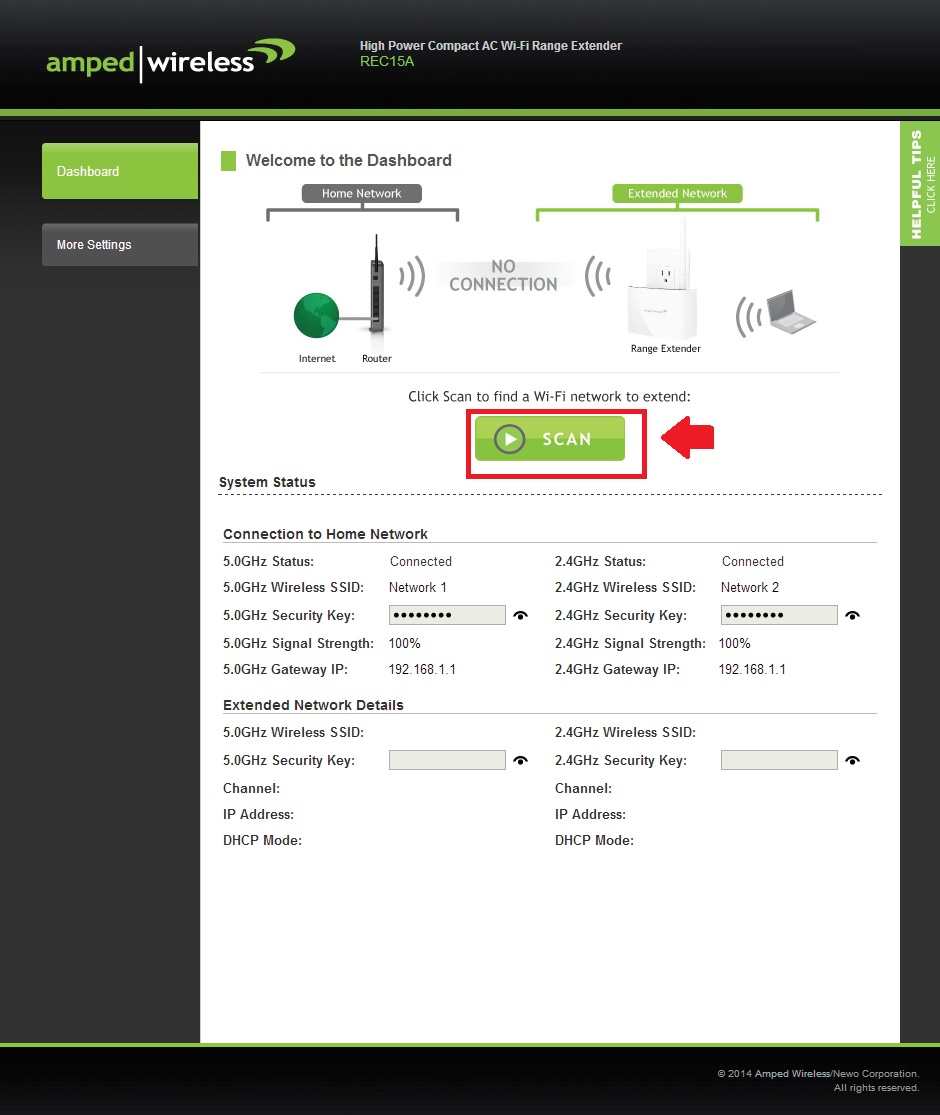
amped wireless range extender

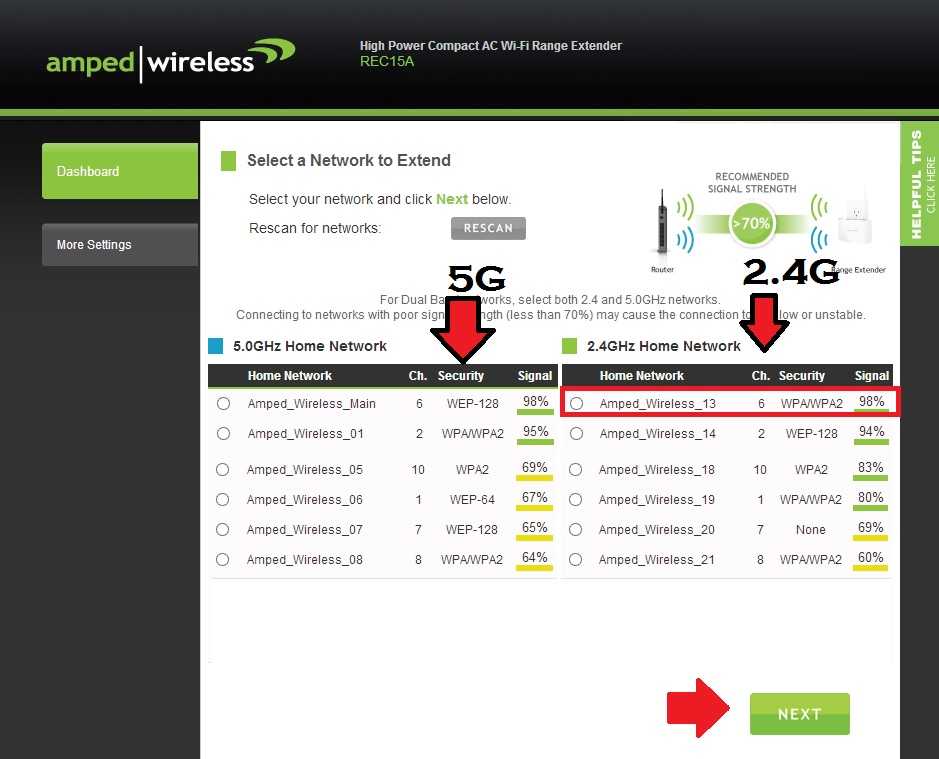
After a few seconds, you will get a list of all wifi networks running nearby extender devices.

If your Host WIFI network supports dual-band (2.4GHZ+5GHz) you will get a WiFI name for both bands and you can choose any brand to connect from an extender device.

If your host wifi router support the signal band (2.4G) then you will get SSID only under the 2.4GHz Home network list as shown below picture.
amped wireless ac2550 wi-fi range extender

Choose the Existing WIFI network you wish to connect from the WiFI booster and press the next button for further configurations.

Provide WIFI security key of existing wifi router to allow connection from repeater device as selected network band from 2.4GHz or 5GHz.
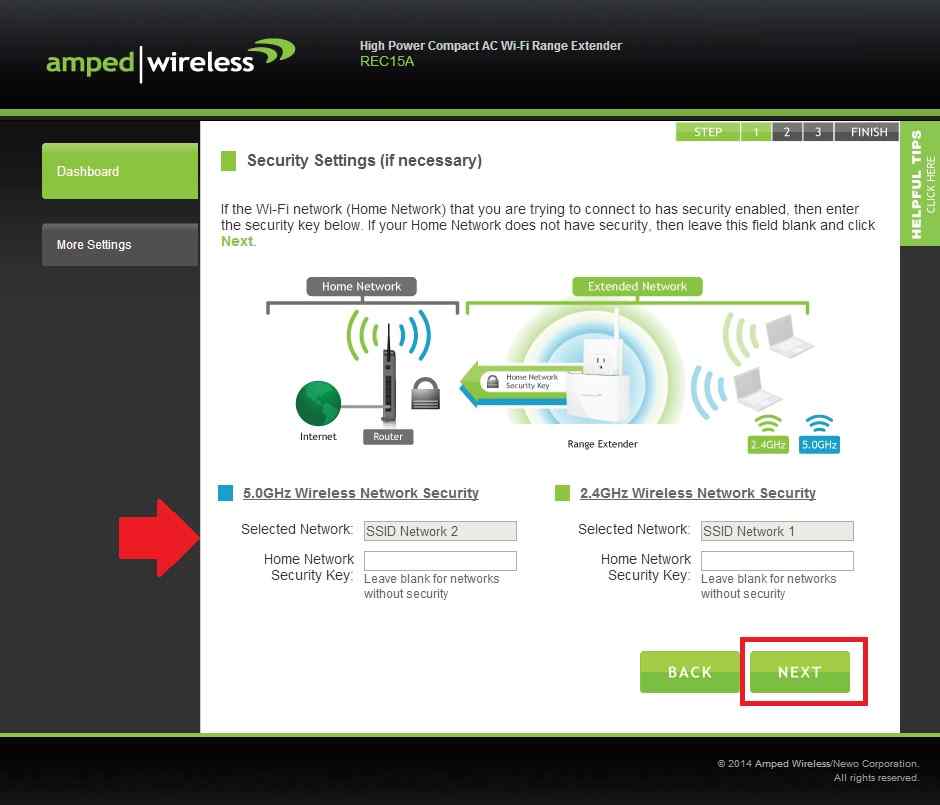
amped wireless setup

Press the Next button.

How to Fix WiFi Signal issue using Old WiFi Router

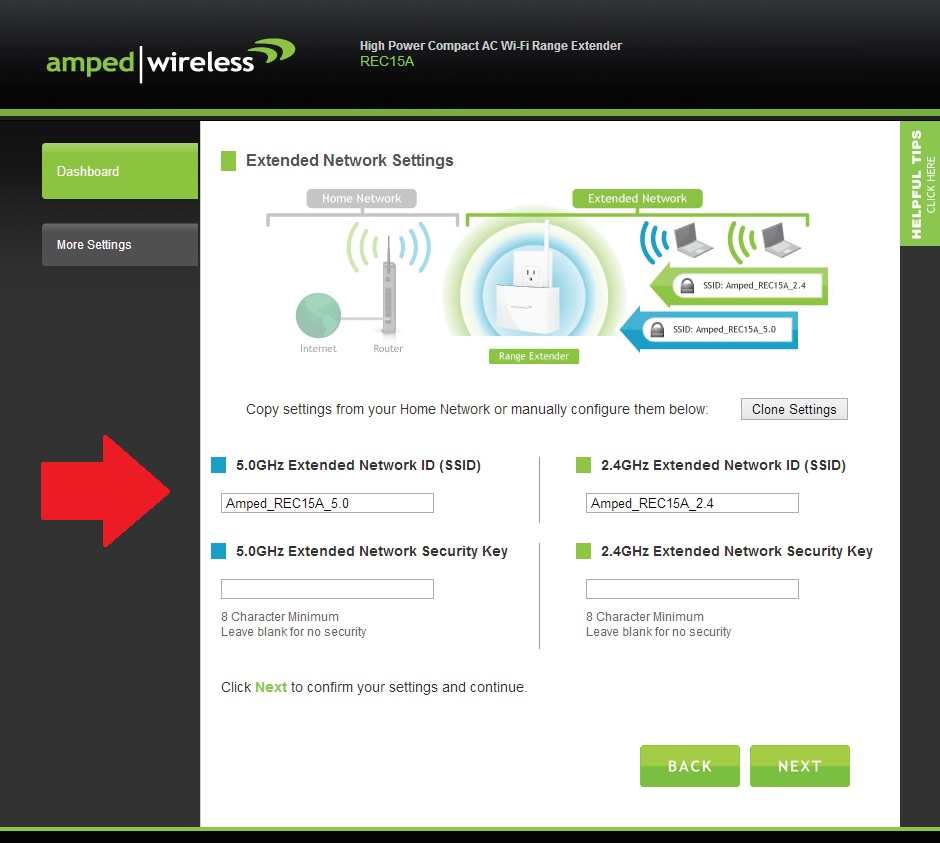
Configure Extended Network Name and password

You can create New WiFi name for the extender name and WiFi password or also can use the default name as configured by amped repeater device.

Provide new Extended Network name for 2.4Ghz and 5GHz network. Create a new repeater WIFI security key and press the next button to finish configurations.
 How to Set Up Amped Wireless REC10 Wifi Range Extender

Press the Next button and the repeater device will take a few movements to finish.

After configuration find the best location to optimize your existing signal range using an Amped signal booster device without connecting to physical wired.

  • Spectrum WiFi Range Extender / Spectrum WiFi Pods Review

Create Login Password for Amped Extender

In default mode, there is no login password configured on the Amped wireless wifi booster device so it is highly recommended to create a log-in password to protect the extender network from unauthorized access.


Go to More settings-Management – Password

Create New Login– Create a login username and password

New password– create a web interface login password.

Confirm Password– confirm a login password


Save settings and log in with a new username and password again to check the connectivity status and signal strength.

If you forget the login password after configuring you may use the reset button to restore the repeater to default mode.

Press the amped extender reset button for 5-10 seconds to factory reset and restore into default mode configurations.


Related Post

  • How to Reuse old WiFi Router with Different Modes
  • How to turn wired IP Camera into Wireless camera
  • How to Configure WiFi Blast Range Extender
  • Best WiFi Router for Long Range
Categories Amped wifi booster, Amped Wireless Tags amped wireless ac1200 setup, amped wireless login, amped wireless range extender, amped wireless rec10 setup, amped wireless rec22pg setup, http //setup.ampedwireless.com, http//setup.amped wireless.com sr10000, setup amped wireless router
Asus Wifi Extender Setup [N300 RP-12N]
Wavlink AC600 Outdoor Wifi Extender Setup

Recent Posts

  • 192.168.11.1 Login Buffalo WiFi to Setup As Range Extender mode
  • 192.168.4.1 Admin Login Router
  • Best 8 port Gigabit Switch for Business and Home
  • How to Fix Spectrum Router Red Light Error ?
  • Why My ATT broadband blinking red ?

Categories

  • 10.0.0.1 (1)
  • 10.0.0.1 (1)
  • 10.1.1.1 (1)
  • 10.1.10.1 (1)
  • 10.10.10.1 (1)
  • 10.10.10.10 (1)
  • 1200Mbps (1)
  • 192.168.0.1 (1)
  • 192.168.0.250 (1)
  • 192.168.0.254 (1)
  • 192.168.0.50 (1)
  • 192.168.1.0 (1)
  • 192.168.1.1 (1)
  • 192.168.1.2 (1)
  • 192.168.1.254 (1)
  • 192.168.1.4 (1)
  • 192.168.10.1 (2)
  • 192.168.10.253 (1)
  • 192.168.10.254 (1)
  • 192.168.100.100 (1)
  • 192.168.11.1 (1)
  • 192.168.15.1 (1)
  • 192.168.16.1 (1)
  • 192.168.188.1 (1)
  • 192.168.188.253 (1)
  • 192.168.2.1 (1)
  • 192.168.254.254 (1)
  • 192.168.3.1 (1)
  • 192.168.4.1 (1)
  • 192.168.42.1 (1)
  • 192.168.8.1 (1)
  • 2Wire AT&T (1)
  • 4G Hotspot Router (1)
  • AC1200 Range Extender (1)
  • AC1200 Range Extender (1)
  • AC1200 Range Extender Setup (1)
  • AC600 Outdoor WiFI Extender (1)
  • Aigital Range Extender (1)
  • Airtel (1)
  • Airtel Xstream (2)
  • Amped wifi booster (1)
  • Amped Wireless (1)
  • Arlo (1)
  • Arlo Base Station (1)
  • Arris (2)
  • Arris TG1682G cable Modem (1)
  • Asus (3)
  • Asus Range Extender (1)
  • AT&T (1)
  • AT&T Compatible Modems (1)
  • Aztech (1)
  • Aztech (1)
  • BelAir 20E (1)
  • BelAir Networks (1)
  • Belkin (2)
  • Brands (2)
  • BSNL (1)
  • BT Extender (1)
  • Buffalo (1)
  • C6300 Cable Modem (1)
  • Cable Modem (1)
  • Cable Modem (1)
  • Cable Modem (1)
  • CCTV (1)
  • CenturyLink Router Login (1)
  • Cisco (1)
  • Cisco Router Login (1)
  • Comcast Xfinity (1)
  • Comfast (1)
  • CradlePoint (1)
  • D-Link (4)
  • DG-5314T (1)
  • DG-5524T (1)
  • DigiCom (1)
  • DSL Modem and Router (1)
  • Ethernet Switch (1)
  • Fiber (1)
  • FTTH ONT/ONU (1)
  • G1208 WiFi Extender (1)
  • Galaway Range Extender (1)
  • How to (7)
  • Huawei (1)
  • iBall (2)
  • IP Address (4)
  • LB-Link (1)
  • Linksys (2)
  • List Default Router IP (1)
  • Lite Beam (1)
  • Mac (1)
  • Medialink (1)
  • Meraki (1)
  • Mercusys (1)
  • MI (1)
  • Moca Adapters (1)
  • Modem with Phone Jack (1)
  • Motorola (1)
  • motorola router login (1)
  • MR70 Wave2 (1)
  • myrepeater (1)
  • Netgear (3)
  • Network (3)
  • Nokia (1)
  • Nokia G2425G-A Fiber ONT (2)
  • ONT (1)
  • OpenWRT (1)
  • Opticover Range Extender (1)
  • Quantum Gateway Router (1)
  • Range Extender (1)
  • Range Extender (1)
  • Repeater/ Range Extender (21)
  • reset spectrum router (1)
  • Review (2)
  • Ring Chime Pro (1)
  • Rockspace WiFI Extender (1)
  • Roku (1)
  • Roku Stick (1)
  • Router Login (1)
  • Router Login (1)
  • Sercomm (1)
  • Setek (1)
  • Spectrum (1)
  • spectrum modem lights (1)
  • SuddenLink (1)
  • Synology (1)
  • Synology RT2600ac (1)
  • TalkTalk router (1)
  • Tenda (3)
  • TP-Link (8)
  • tplinkwifi-net (1)
  • TRENDnet (1)
  • Troubleshooting (1)
  • Ubiquiti (1)
  • Uncategorized (2)
  • Uniway (1)
  • Urant WiFi Repeter Setup (1)
  • VDSL/ADSL Modem (1)
  • Verizon (1)
  • Verizon WiFi Extender (1)
  • Victony (1)
  • VPN Routers (1)
  • WA1200 Range Extender (1)
  • Wavlink (3)
  • Wavlink AC1200 (1)
  • Wi-Fi Disconnection Problem (1)
  • WiFi (11)
  • WiFi Range Extender setup (1)
  • WiFI Repeater Setup (1)
  • WiFi Router (1)
  • WiFiBlast (1)
  • Windows (2)
  • Windstream (1)
  • Zyxel (1)

Tags

192.168.1.1 show password 192.168.1.101 login 192.168.10.1 wifi repeater setup 192.168.l.0.1 login asus repeater setup rt-n12 best wifi extender best wifi extender 2019 best wifi extender cnet best wifi extender for gaming best wifi repeater india comfast 1200mbps dual band repeater setup comfast outdoor wifi extender comfast wifi extender setup uk d'link extender admin password dlink login how to access asus router in repeater mode how to connect to internet using ethernet cable windows 10 how to create lan in windows 10 for gaming how to reset wifi repeater how to use wifi extender http //192.168.o.1.100 login huawei router login username and password long range wifi extender netgear extender default password netgear router login netgear wifi extender netgear wifi extender n300 setup nokia g2425g-a manual nokia g2425g-a router manual router login sagemcom router red light tp-link archer c7 repeater mode tp-link login tp link extender setup without wps tp link range extender tl-wa860re setup wavlink ac1200 outdoor wavlink manual wavlink wifi extender wavlink wifi range extender setup wifi.wavlink.com login wifi booster walmart wifi extender wifi repeater amazon wifi repeater setup zyxel 192.168 login
Follow me on Blogarama

Archives

Recent Posts

  • 192.168.11.1 Login Buffalo WiFi to Setup As Range Extender mode
  • 192.168.4.1 Admin Login Router
  • Best 8 port Gigabit Switch for Business and Home
  • How to Fix Spectrum Router Red Light Error ?
  • Why My ATT broadband blinking red ?
Content Protection by DMCA.com
  • Contact US
  • Privacy Policy
  • Terms and Conditions
  • Disclaimer
© 2026 • Built with GeneratePress